![]() Home
Home
![]() The Alliance
The Alliance
![]() Exhibits
Exhibits
![]() Gallery
Gallery
![]() Resources
Resources
![]() Calendar
Calendar
![]() Competitive Exhibits
Competitive Exhibits
![]() Advocacy
Advocacy
![]()
![]() Technical Articles
Technical Articles
![]() Supplies
Supplies
![]() Links
Links
![]() Library
Library
Stenocuts
by Sue Anne Bottomley
|
Necessity is clearly the mother of many printmaking inventions. Some artists are making radical changes in intaglio, screen printing and lithography. I had made soft-ground etchings for many years, but needed to rethink my printing methods because of shoulder problems and sensitivity to solvents. Stenocut, a word I made up, is basically a relief process. It covers several printmaking techniques that I have devised and developed over the past five years. It can be both traditional and experimental; it is low-tech, yet complex enough to challenge the experienced printmaker. This summary of the stenocut process includes what I have learned in my studio and discoveries made in four years of workshops, with students ranging from age 5 to 85, beginners and professional printmakers. Stenocut had its debut in March 1994 when I presented it at a technical marketplace for innovative printmaking at the Southern Graphics Council Conference in Fort Worth, Texas. I use a commercial product called sandblast stencil. Although I had not seen this product since my childhood, I was familiar with it because my grandfather was a stonecutter and monument maker. I used to play with scraps of the rubbery material on the floor of his workshop. Not that I ever sandblast stone: I carve and ink the stencil material as if it were linoleum. As a bonus, it turns out to be much more versatile. What exactly is so appealing about sandblast stencil as a printing plate? The soft grey-white rubber comes in rolls 25 inches high by ten yards long (635 mm by nearly ten meters). It cuts like butter with traditional linocut tools, yet prints a clean edge and it holds up well for medium-sized editions. The material is very thin and therefore can easily be cut into shapes with scissors or mat knife. I use this advantage to cut complex shapes, print jig-saw plates and re-use bits and pieces in successive editions. As it is a commercial product, available at monument and sign supply companies, it is much less expensive than art shop purchases. Plate preparation is simple. Just peel off the plastic backing and stick it on a smooth surface such as poster board. Some people stick it on acrylic, while I much prefer the paper backing because I like to cut my plates into pieces. Pencil designs will transfer readily, just rub the back of the drawing with a spoon. Fresh newspaper photos and text as well as graphite rubbings also transfer easily under the pressure of a spoon and without solvent. Photographic images can be incorporated into this process using copies and oil of wintergreen (a methyl salicylate muscle rub) which I buy from my pharmacist. Most copier images will transfer if rubbed lightly with a small amount of this oil on cloth or paper towel. The oil has a pleasant but strong odor, so adequate ventilation is recommended. I put the oil-saturated copies in a plastic bag and put them in the trash right away. You can copy your own photographs, sketch-pad drawings and newspaper images. When using a copier, you have the advantage of being able to change the size of the image easily or to reverse it. If you cannot locate any oil of wintergreen, you can always draw a pencil line around the edges of your copier image, and then transfer the pencil line to the plate with a spoon. The image must still be carved after it is transferred. An artist can use traditional linocut tools, both gouge and pull types. Long gestural strokes are possible since the material is not brittle. Experiment-minded artists can emboss the material with various textures, e.g. from coarse sandpaper, rug backing and metal screening. I have even thought of a way to embed thin bits of paper, string and organic material like pine needles between the soft thin plate and the paper backing. When this is printed the edges of the images are very soft with ghost-like white shapes around them. No carving at all is required for this. And the plates work very well as the base for collagraphs. For a few prints, I experimented by printing the plate in intaglio instead of relief. I used water-based inks, inking the plate in areas about four inches square; as the ink dried, I moved on to the next area. By printing with damp paper, the rewettable inks were brought back to life under the pressure of the press. Always use sample plates to test pressure and inks. If you have deeply carved areas you wish to print in intaglio, pull out some of the ink with your finger to prevent it squishing out in the press. Not all water-based inks are rewettable, so some people mix a retarder with water-based inks. Several printing methods are possible. A traditional three-color print works well. Use very light pressure if you use a press. A reduction print is another option, while I tend to use the jig-saw method in which several plates are separately inked, then reassembled like a puzzle. Sometimes I do an overprinting of smaller shapes on top, using just the pressure of a spoon. (When I used oil-based inks, I coated the plates with an acrylic medium since the oil-based ink and clean-up solvent will dissolve an uncoated plate; now I only use water-based ink and skip this step.) The commercial product name is #111 LO-TAK sandblast stencil by Anchor Continental, Columbia, South Carolina, USA. It is available at sign supply companies (look in the telephone book) or through friendly local monument-makers (gravestones) or from art supply companies for schools. Sue Anne Bottomley can be reached by e-mail at: stenocut@usa.net and by mail at: 5246 Wildflower Terrace, Columbia MD 21044 |
 Sue Anne Bottomley Blind Date © Stenocut
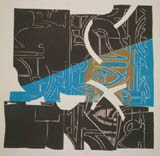 Sue Anne Bottomley Hop Skip Jump © Stenocut
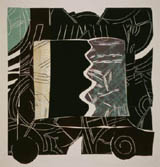 Sue Anne Bottomley Tandem © Stenocut |